
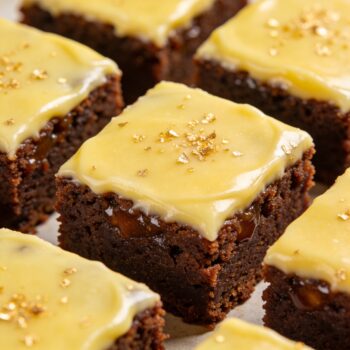
Ainsley Harriott’s Banoffee Pie is a no-fuss, no-bake take on one of Britain’s most beloved desserts — a buttery digestive biscuit base, a thick layer of ready-made banoffee toffee sauce, fresh sliced bananas, a cloud of coffee-whipped cream, and a finishing drizzle of dark chocolate that turns a simple assembly job into something that looks genuinely spectacular on the table. No boiling cans of condensed milk for five hours, no pastry case to blind bake — just clever shortcuts that deliver all the flavour with a fraction of the effort.
Table of contents
- Ainsley Harriott Banoffee Pie Ingredients
- How To Make Ainsley Harriott’s Banoffee Pie
- Recipe Tips
- Make It Your Own — Creative Twists 💡
- What To Serve With Ainsley Harriott’s Banoffee Pie
- How To Store Ainsley Harriott’s Banoffee Pie
- Nutrition Facts (per serving, based on 8 servings)
- FAQs
- Try More Ainsley Harriott Recipes:
Ainsley Harriott Banoffee Pie Ingredients
For the Biscuit Base
- 225g digestive biscuits
- 100g butter, melted
Filling & Topping
- 1 jar (approximately 400g) ready-made banoffee toffee sauce
- 3 ripe bananas, peeled and sliced
- 300ml double cream
- 1 tsp instant coffee granules
- 1 tbsp caster sugar
For the Chocolate Drizzle
- 50g dark chocolate, melted
How To Make Ainsley Harriott’s Banoffee Pie
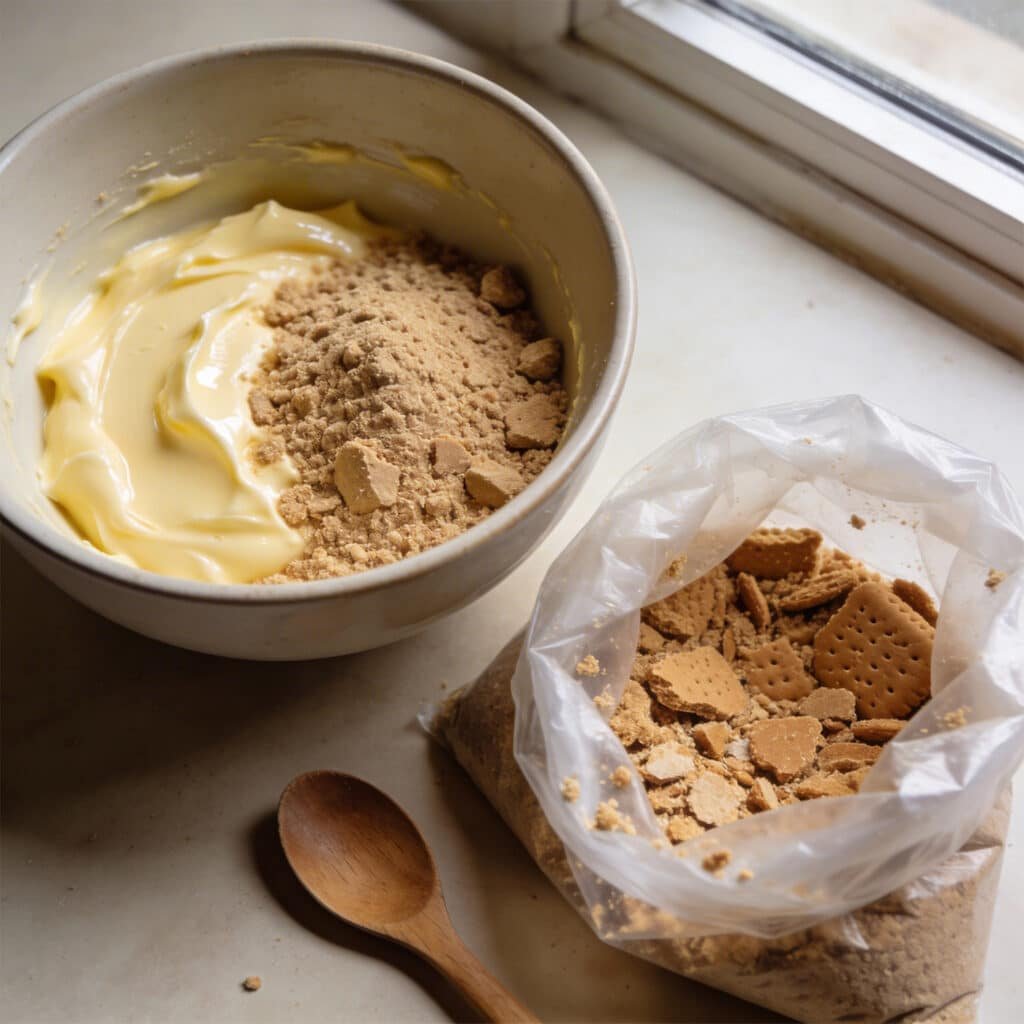
- Make the biscuit base: Put the digestive biscuits into a sturdy plastic bag and crush into fine crumbs using a rolling pin — you want an even, sandy texture with no large chunks remaining. Melt the butter in a medium saucepan over a low heat, then stir in the crushed biscuits until every crumb is coated and the mixture holds together when pressed.
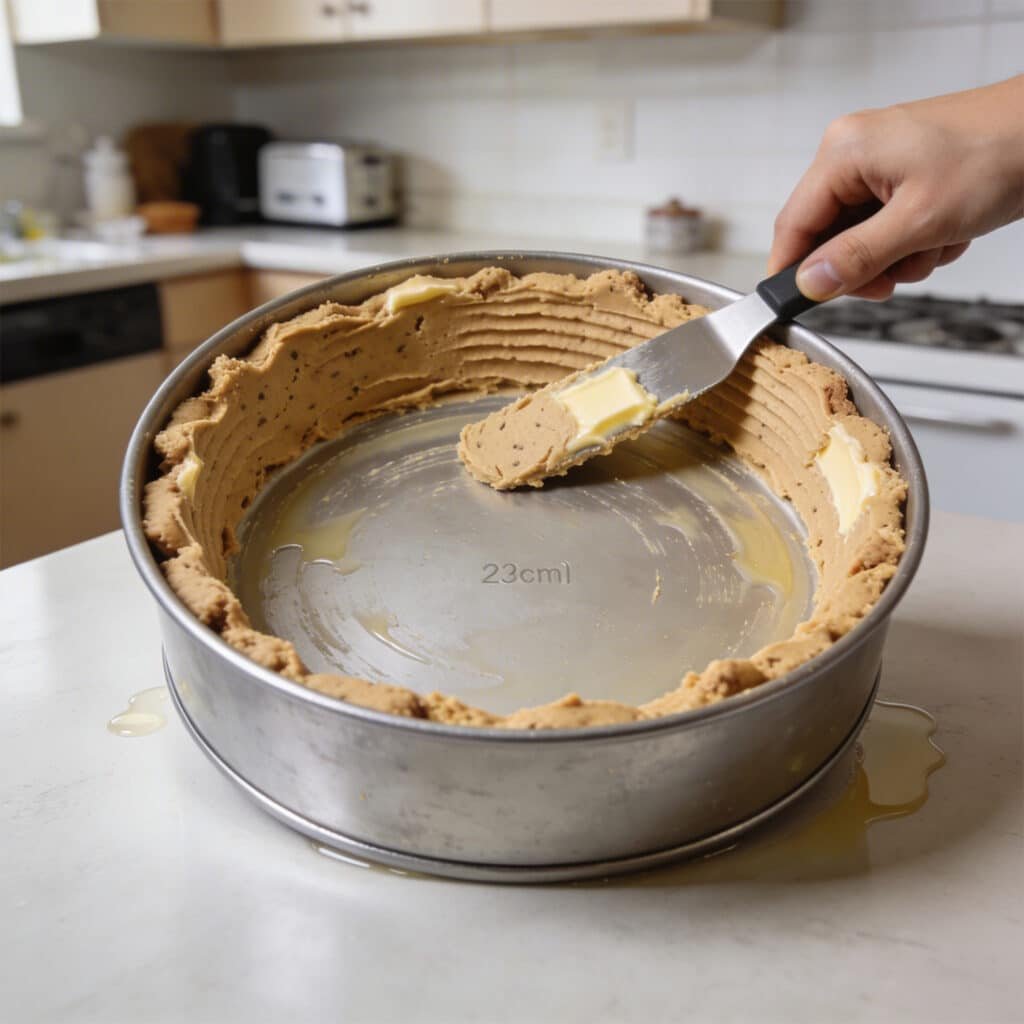
- Form and chill the base: Press the biscuit mixture firmly onto the base and up the sides of a lightly oiled loose-bottomed flan tin, approximately 23cm wide and 4cm deep. Use the back of a spoon to compact it evenly — a firm, even base will hold clean slices later. Place in the fridge and chill for 15 minutes until set.
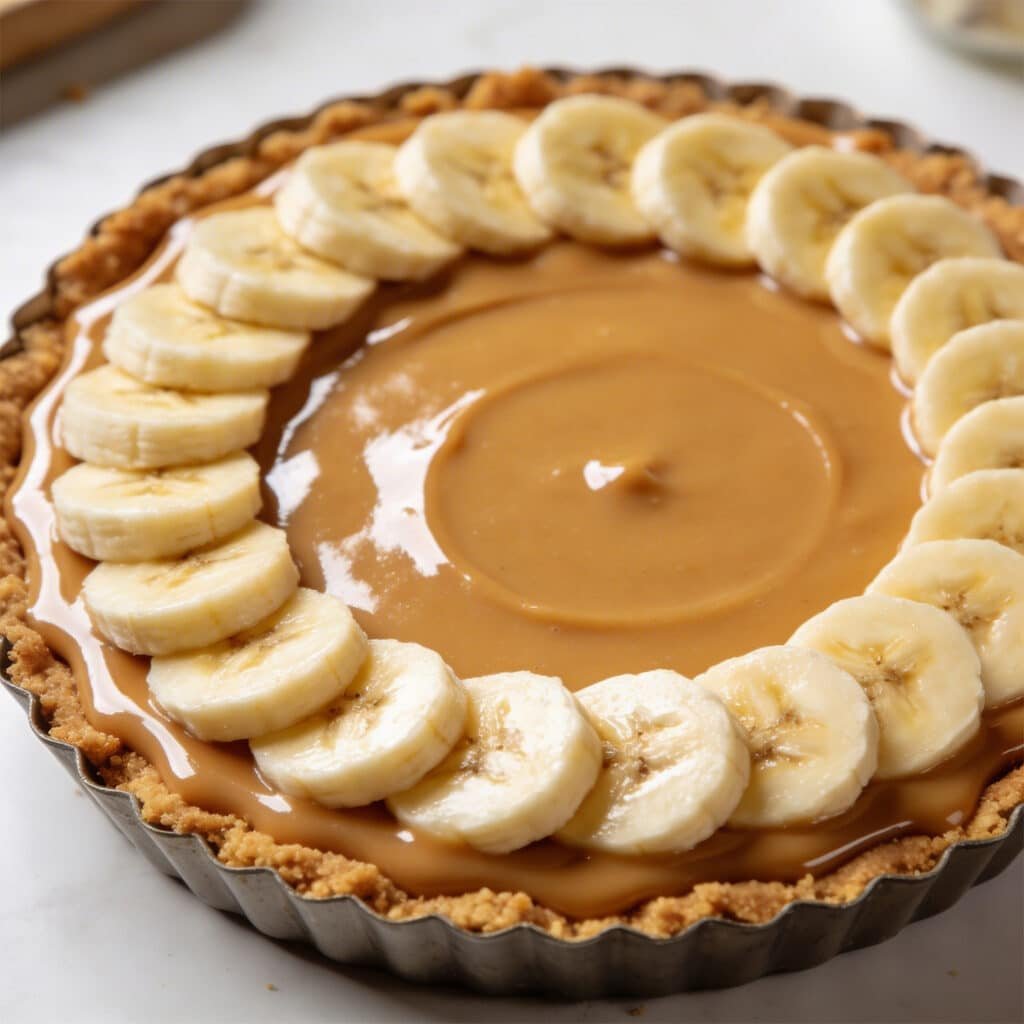
- Add the toffee layer: Spread the banoffee toffee sauce evenly over the chilled biscuit base in a generous, even layer, reaching to the edges. Arrange the sliced bananas over the toffee in an even layer, covering the surface completely.
- Whip the cream: In a large bowl, lightly whip the double cream together with the instant coffee granules and caster sugar until the mixture holds soft peaks — it should be thick enough to hold its shape but still have a gentle, pillowy texture. Do not over-whip the cream, or it will become grainy and stiff.
- Top and chill: Spoon the coffee-whipped cream over the banana layer and spread it out to the edges, creating a seal with the biscuit case. Swirl the top attractively with the back of a spoon. Place the pie in the fridge and chill for at least 1 hour — this is not optional, the layers need time to firm up and meld together before slicing.
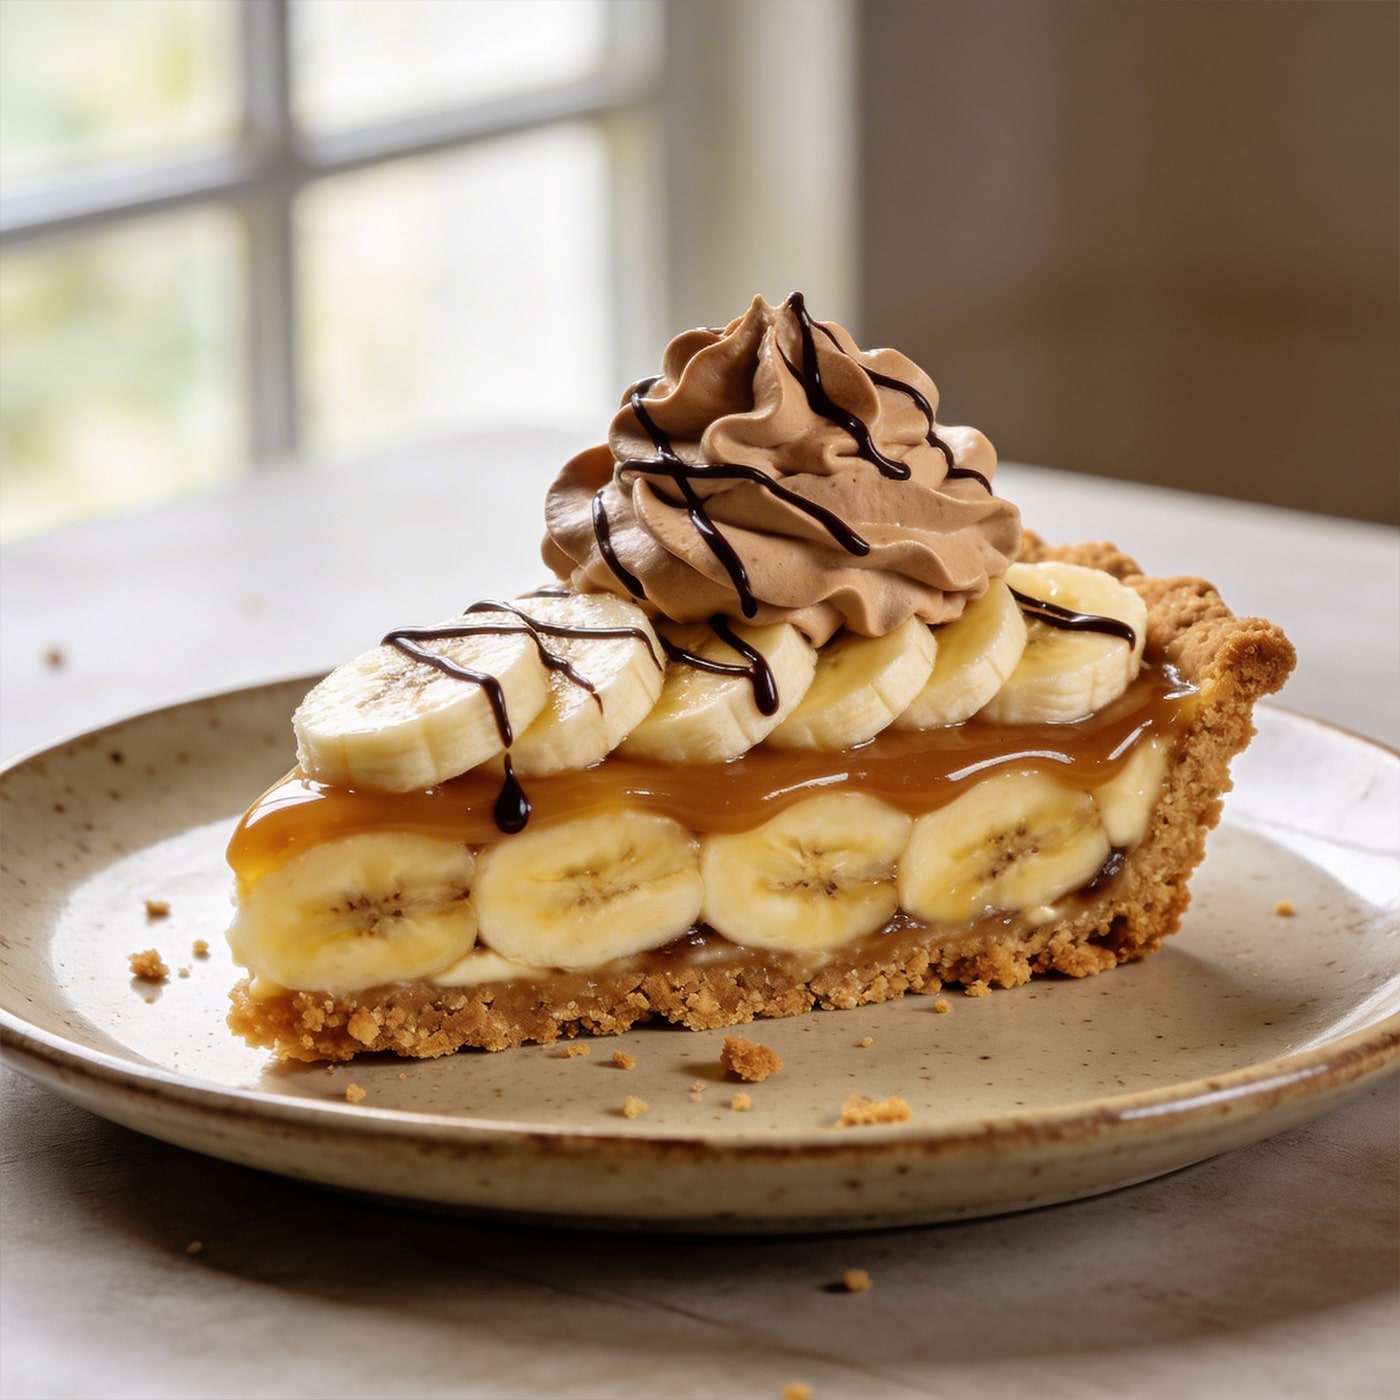
- Finish and serve: Just before serving, drizzle the melted dark chocolate over the cream in whatever pattern you like — back-and-forth lines, a swirl, or a freestyle drizzle — all look equally good. Remove the pie carefully from the tin, slice, and serve immediately.
Recipe Tips
Use ripe but not overripe bananas: They should be sweet and soft but still hold their shape when sliced. Overripe bananas turn brown and mushy very quickly once cut, affecting both the appearance and texture of the finished pie. Slice the bananas immediately before using and assemble without delay.
Press the biscuit base firmly and evenly: The base must be compacted properly to hold clean slices. Use the base of a flat-bottomed glass or the back of a metal spoon to press the crumbs down with real pressure, working from the centre outward and up the sides. A loosely packed base crumbles and collapses the moment the first slice is cut.
Do not over-whip the cream: The cream should reach soft peaks — when you lift the whisk, the peak should curl over gently. Over-whipped cream goes grainy and stiff and is very difficult to spread attractively. If you go too far, add a splash more unwhipped double cream and fold it in gently to bring it back.
Chill for at least 1 hour before serving: The chilling time is structural, not just for temperature. It allows the toffee layer to firm slightly so it does not flow when sliced, and it allows the cream to set so the layers hold their definition on the plate. Serving too soon means a delicious but structurally chaotic pie.
Use a loose-bottomed tin: A loose-bottomed flan tin makes removing the pie clean and easy. If you do not have one, line a regular tin with cling film with enough overhang to lift the pie out cleanly before slicing. Never try to serve a no-bake pie directly from a fixed-bottom tin — it will not come out in one piece.
Ainsley Harriott Banoffee Pie Recipe
Equipment
- 23cm Loose-Bottomed Flan Tin
- Rolling Pin
- Large Mixing Bowl
- Electric or Hand Whisk
- Plastic Bag (for crushing biscuits)
- Medium Saucepan
Ingredients
For the Biscuit Base
- 225 g digestive biscuits crushed to fine crumbs
- 100 g butter melted
For the Filling and Topping
- 400 g ready-made banoffee toffee sauce 1 jar
- 3 ripe bananas peeled and sliced
- 300 ml double cream
- 1 tsp instant coffee granules
- 1 tbsp caster sugar
For the Chocolate Drizzle
- 50 g dark chocolate melted
Instructions
- Put the digestive biscuits into a sturdy plastic bag and crush into fine crumbs using a rolling pin until you have an even, sandy texture with no large chunks remaining. Melt the butter in a medium saucepan over a low heat, then stir in the crushed biscuits until every crumb is coated.
- Press the biscuit mixture firmly onto the base and up the sides of a lightly oiled 23cm loose-bottomed flan tin. Use the back of a spoon to compact it evenly. Place in the fridge and chill for 15 minutes until set.
- Spread the banoffee toffee sauce evenly over the chilled biscuit base in a generous, even layer reaching all the way to the edges. Arrange the sliced bananas over the toffee in an even layer, covering the surface completely.
- In a large bowl, lightly whip the double cream together with the instant coffee granules and caster sugar until the mixture just holds soft peaks — thick enough to hold its shape but still pillowy. Do not over-whip.
- Spoon the coffee-whipped cream over the banana layer and spread it out to the edges, creating a seal with the biscuit case. Swirl the top attractively with the back of a spoon. Place in the fridge and chill for at least 1 hour.
- Just before serving, drizzle the melted dark chocolate over the cream in your preferred pattern. Remove the pie carefully from the tin, slice, and serve immediately.
Notes
Make It Your Own — Creative Twists 💡
Add a layer of chocolate ganache under the toffee — Melt 100g of dark chocolate with 50ml of double cream and pour it over the chilled biscuit base before the toffee goes on. Allow it to sit in the fridge for 10 minutes first. The thin chocolate layer adds a bitter contrast that beautifully cuts through the sweetness of the toffee and cream — and it keeps the base from going soft.
Use ginger nut biscuits instead of digestives — Swap the digestive biscuits for the same quantity of ginger nut biscuits for a warmly spiced base that works brilliantly with banana and toffee. The ginger note adds depth and a gentle heat that makes the whole pie feel more complex without any additional effort.
Make individual banoffee pots instead of one large pie — Layer the crushed biscuit base, toffee, banana, and cream in individual glasses or small jars for a dinner party-friendly version that requires no slicing and looks elegant on the table. Drizzle the chocolate over each glass just before serving.
Add a pinch of sea salt to the toffee layer — Stir a good pinch of flaky sea salt into the banoffee toffee sauce before spreading it over the base. Salted caramel and banana is one of the great flavour combinations — the salt amplifies the sweetness rather than fighting it and makes every mouthful more interesting.
Top with toasted coconut flakes — Scatter a handful of lightly toasted coconut flakes over the chocolate drizzle for a tropical twist that adds crunch, flavour, and a beautiful visual contrast against the dark chocolate and pale cream.
What To Serve With Ainsley Harriott’s Banoffee Pie
Extra Dark Chocolate Drizzle: If you are serving guests who love chocolate, melt an extra 25g of dark chocolate and offer it at the table for people to drizzle over their own slice. It makes the serving feel generous and interactive.
Vanilla Ice Cream: A small scoop of good vanilla ice cream alongside a slice of banoffee pie is an indulgent but genuinely excellent combination — the ice cream against the rich toffee and cream is deeply satisfying.
You Might Also Like
Fresh Raspberries: A handful of fresh raspberries on the side adds a sharp, fruity contrast that cuts through the richness of the toffee and cream and makes the plate look beautiful with minimal effort.
Espresso or Strong Coffee: The coffee in the whipped cream is a hint at how well this dessert pairs with a strong espresso after dinner. The bitterness of good coffee cuts through the sweetness of the toffee and leaves the palate feeling clean.
How To Store Ainsley Harriott’s Banoffee Pie
Refrigerate: Cover the pie loosely with cling film and store in the fridge for up to 2 days. The bananas will begin to discolour slightly after the first day, but the flavour remains excellent.
Best on the day: For the cleanest appearance and the best texture, this pie is at its absolute peak on the day it is assembled and chilled. The biscuit base begins to soften slightly by day two as moisture from the toffee and cream migrates downward.
Do not freeze: This pie does not freeze well. The cream separates on thawing, and the bananas turn mushy. Make it fresh and serve within two days.
Prep ahead: The biscuit base and toffee layer can be prepared up to 24 hours in advance and kept covered in the fridge. Add the banana, cream, and chocolate drizzle on the day of serving for the best result.
Nutrition Facts (per serving, based on 8 servings)
| Nutrient | Amount |
|---|---|
| Calories | ~480 kcal |
| Protein | 4g |
| Carbohydrates | 52g |
| Fat | 28g |
| Saturates | 16g |
| Sugar | 36g |
| Salt | 0.4g |
Nutrition estimated per serving, including biscuit base, toffee, banana, cream, and chocolate drizzle.
FAQs
Yes. Melt 100g of butter with 100g of dark brown soft sugar in a saucepan over a medium heat, stirring until the sugar dissolves. Add a 397g tin of condensed milk and bring to a gentle boil, stirring continuously for 3–4 minutes until the mixture thickens and turns a deep caramel colour. Pour into the biscuit case and allow to cool completely before adding the bananas. The homemade version has a deeper, more complex flavour than jarred toffee. For a full guide to making caramel sauce safely at home, BBC Good Food’s caramel sauce tutorial is clear and reliable.
A crumbling base is almost always the result of insufficient butter or insufficient compression. The butter acts as the binder that holds the crumbs together once it sets cold — if the ratio is off or the crumbs were not pressed firmly enough into the tin, the base will not hold. Ensure every crumb is coated in butter before pressing, and use real downward pressure when compacting. Chilling for a full 15 minutes before adding the filling is also essential. For a deeper look at no-bake biscuit bases and how to get them right, Serious Eats has a detailed breakdown of the technique that applies directly to banoffee pie.
The bananas will begin to oxidise and turn brown once sliced and exposed to air. To slow this down, squeeze a very small amount of lemon juice over the sliced bananas before layering them into the pie — the acidity slows the oxidation without affecting the flavour noticeably. Alternatively, assemble the banana layer and immediately cover it with the cream, which creates a barrier against air. The Royal Horticultural Society’s guide to banana ripeness and storage explains the science behind banana browning if you want to understand it further.
Yes, but with some caveats. Whipping cream has a lower fat content than double cream and will produce a slightly lighter, less stable topping that may not hold its shape as firmly once sliced. Double cream is strongly preferred for this recipe because its higher fat content creates a more stable whipped texture that holds clean edges on the plate. If whipping cream is all you have, whip it to firm peaks rather than soft peaks to compensate for the lower fat content.